Getting Started
Welcome to CSP Connect! This guide covers everything you need to get started with the mobile app so you can begin working at events.
Before You Start
Section titled “Before You Start”- Have your phone connected to Wi-Fi and keep your email and notifications open.
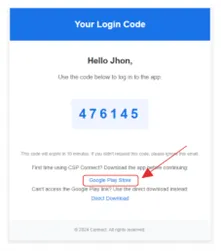
- Your one-time 6-digit login code is in a separate email from CSP Connect. You will need it to log in after installing the app. The code is valid for 7 days.
- Always keep your CSP Connect app updated via Google Play or the App Store.
- If you get stuck, refer to the Troubleshooting & FAQs section.
What You Can Do with CSP Connect
Section titled “What You Can Do with CSP Connect”- See your assigned session: event name, site, date, and time.
- Check in and check out: so your time is recorded properly.
- Start and end breaks: breaks are paid but must be logged.
- Respond to one-time prompts: location requests, liveness-check requests, and extended-hours prompts from your manager.
- Find your manager’s details: and request help regarding the app.
Download the App
Section titled “Download the App”CSP Connect is available as a native mobile application for casual workers. Choose the option that applies to your device below.
TestFlight is the only supported installation method for iPhone and iPad.
New users: installing for the first time
- Tap the button below to download TestFlight. The App Store will open. Tap Get to install TestFlight.
- Once TestFlight is installed, open the CSP Connect invitation email and tap Install CSP Connect (iOS). TestFlight will open and show the CSP Connect card.
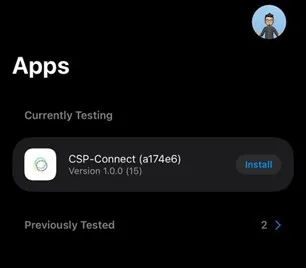
- Tap Install in TestFlight and wait for the progress circle to finish.

- Open CSP Connect. Enter your 6-digit code from the email and tap Continue to log in.
Existing iOS users: updating the app
Open TestFlight and tap Update next to CSP Connect. No reinstallation needed. Open the app and enter your 6-digit login code when prompted.
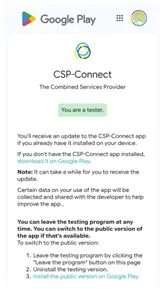
CSP Connect is now available on the Google Play Store as a production release.
New users: installing for the first time
- Open the Google Play Store on your Android phone.
- Search for CSP Connect and tap Install.
- Once installed, open the app and enter your 6-digit login code from your email. Tap Continue to log in.
Existing users: moving to the production release
If you previously had CSP Connect installed via Google Play (closed testing), you only need to update the app. No reinstallation is needed.
- Open the Google Play Store and search for CSP Connect.
- Tap Update.
- Once updated, open the app and continue as normal. Your session remains active.
If you previously installed CSP Connect via a direct APK download, you must uninstall it and reinstall from Google Play. The APK and Google Play versions are separate and cannot be updated directly. This is a one-time step.
- Uninstall the current CSP Connect app from your phone. Go to Settings > Apps > CSP Connect > Uninstall, or press and hold the app icon and select Uninstall.
- Open the Google Play Store and search for CSP Connect, then tap Install.
- Once installed, open the app and enter your 6-digit login code from your email when prompted.
First-Time Setup
Section titled “First-Time Setup”You will receive a separate email from CSP Connect containing your 6-digit login code. The code is valid for 7 days. Please complete this step as soon as possible and do not wait until the day of your booking.
-
Open the CSP Connect app on your device.
-
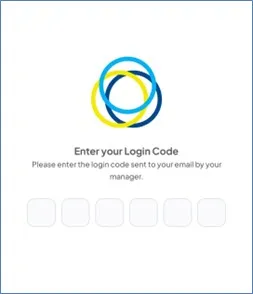
Enter the 6-digit one-time code from the email exactly as shown.
-
Tap Continue to log in.
-
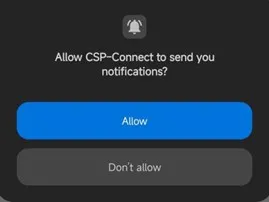
If prompted, tap Allow so you do not miss shift prompts. CSP Connect notifications are set to bypass Do Not Disturb on both Android and iOS to ensure you always receive critical shift alerts.
-
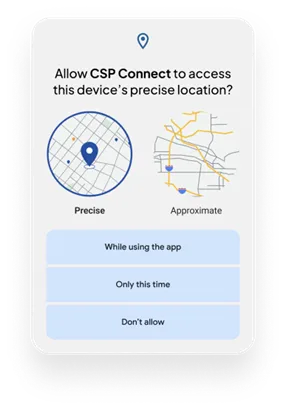
If prompted, allow location access for one-time location request prompts. Tap While using the app.
-
On the Home screen, verify your name and your next session.
Your Dashboard
Section titled “Your Dashboard”After logging in you will see your Home Dashboard. Sessions are grouped into four categories:
- Active: sessions currently in progress that you are checked into.
- Upcoming: confirmed future shifts with prerequisites.
- Missed: sessions that passed without a check-in.
- Completed: finished sessions with approved hours.
The dashboard also shows Available Actions (e.g., “Check In”) and Recent Shifts with a summary of your past worked hours.
Opening Your Assigned Session
Section titled “Opening Your Assigned Session”When you tap your assigned session, the app opens the Prerequisites area. At the top you will see two tabs:
Requirements to Check-In
Section titled “Requirements to Check-In”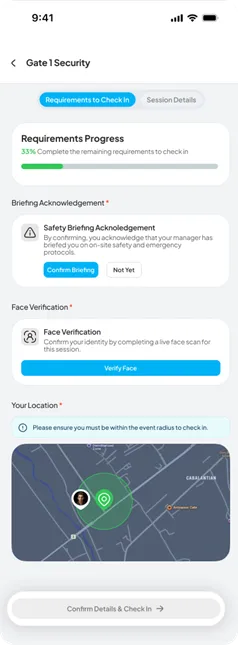
This tab lists everything you must complete before you can check in. Complete each item. If a line still shows as not completed, tap it to read the instructions or contact your manager from the Manager Card.
Requirements Progress
A percentage bar shows how close you are to being ready. Each time you complete a requirement, the progress updates automatically.
Briefing Acknowledgement (required)
- Safety Briefing Acknowledgement: a short statement confirming you have received on-site safety and emergency information from your manager. Tap Confirm Briefing when you have been briefed.
- Not Yet: if you have not been briefed, tap Not Yet. The item stays incomplete and check-in remains locked until your briefing is finished.
Face Verification (Liveness) (required when shown)
- Tap Verify Face and follow the on-screen steps: keep your face inside the circle, hold the phone steady, and adjust lighting if asked.
- If verification succeeds, you will return to the checklist with the item marked complete.
- If it fails, try again with better lighting and your face centred.
Your Location (required)
- Turning Location on and enabling Wi-Fi (for better GPS accuracy) help the app place you correctly.
- The map shows a green ring for the allowed area and your current position. If you are outside, walk into the green ring until the banner clears.
How the geofence check works depends on whether your session uses sub-sessions:
| Scenario | What you need to do |
|---|---|
| No sub-sessions | Be within the main session geofence to check in. |
| Sub-sessions assigned | Be within your assigned sub-session’s geofence to check in. The main session geofence alone is not enough. |
Confirm Details & Check In
When all required items are complete and you are inside the event radius, the bottom button unlocks. Tap Confirm Details & Check In to open the final sheet and slide to confirm.
Session Details
Section titled “Session Details”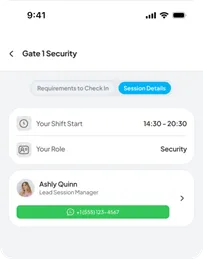
This tab shows your shift information:
- Your Shift & Start: today’s shift window (e.g., 14:20–20:30).
- Your Role: the role you are assigned to (e.g., Security).
- Manager Card: shows the session manager with quick actions: Call, Message, and (if available) Request Replacement Gear for lost or defective items.
Quick Reference
Section titled “Quick Reference”| Step | Action |
|---|---|
| 1 | Complete prerequisites |
| 2 | Check in |
| 3 | Start break |
| 4 | End break |
| 5 | Extended hours (if requested by your manager) |
| 6 | Check out |