Managing Events & Sessions
The Events & Sessions section is the heart of the Admin Dashboard. Here you can see a high-level view of all engagements and drill down into specific session details to manage casual workers.
Event List
Section titled “Event List”Upon navigating to Events & Sessions, you are presented with the Event List. This view shows all active and upcoming events.
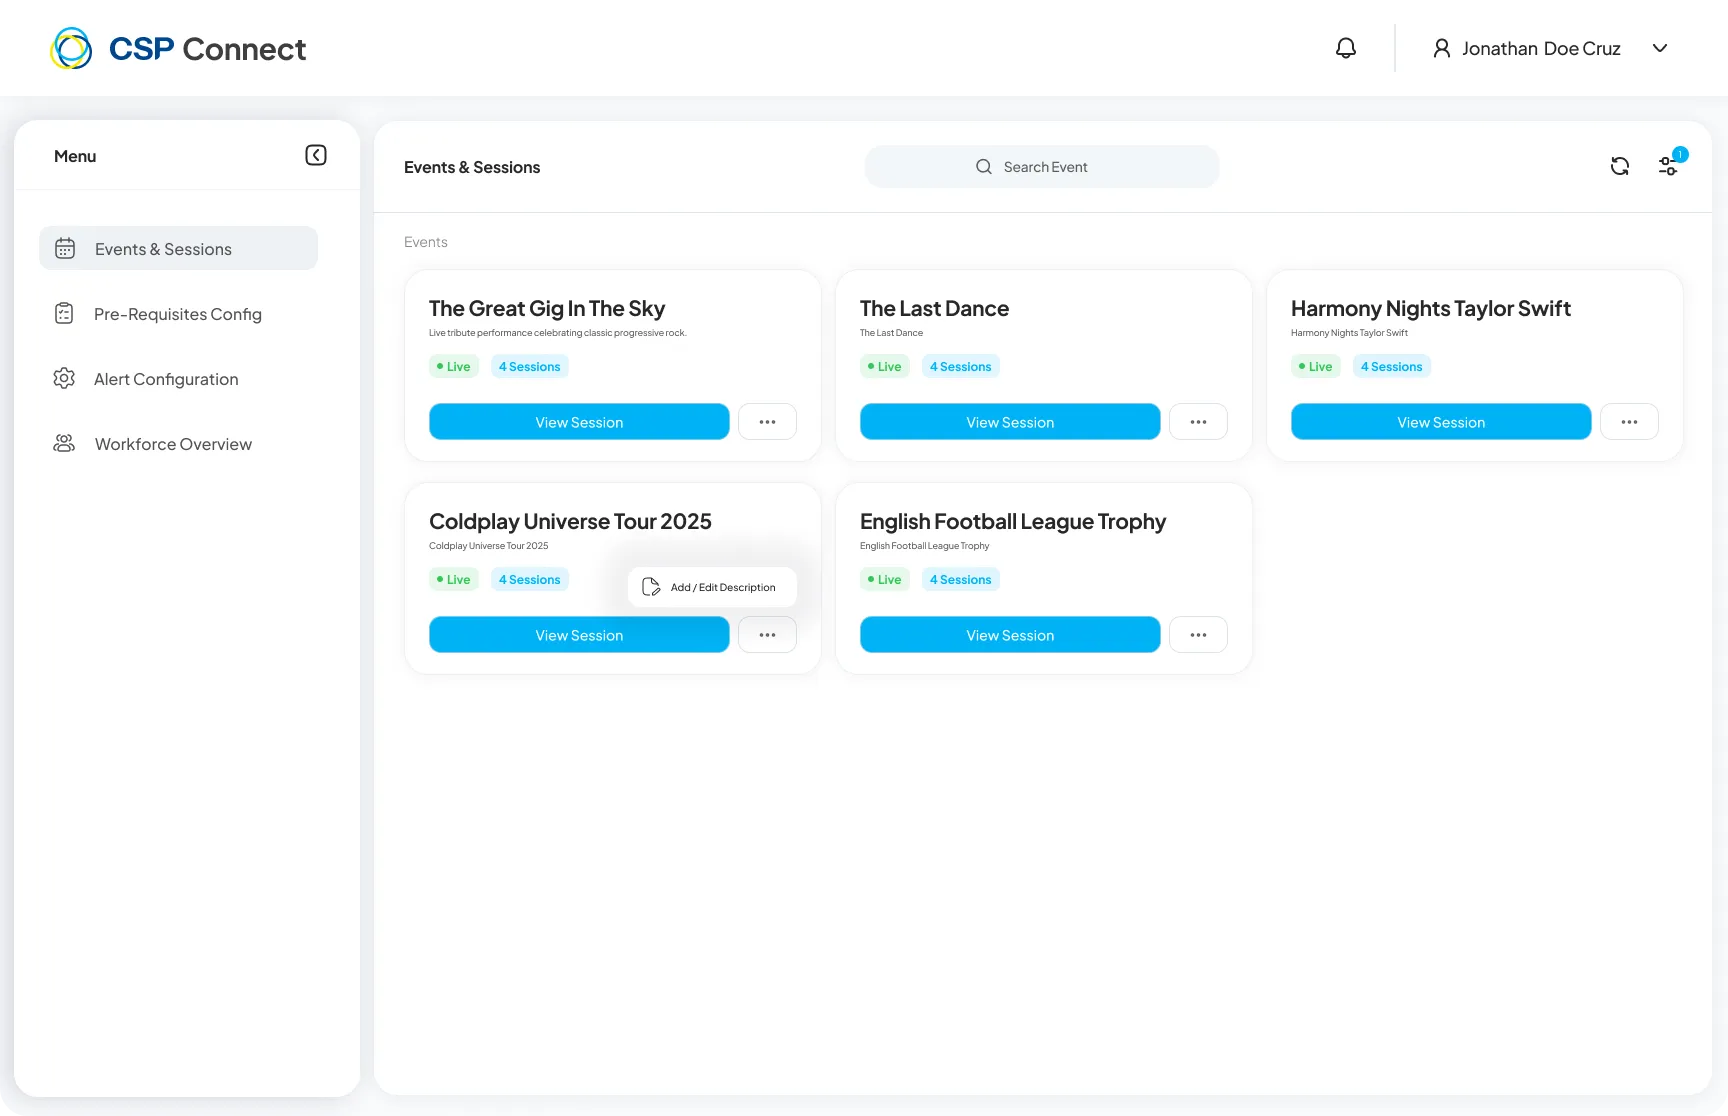
Key Information:
- Event Title: e.g., “The Great Gig In The Sky”.
- Client: The organizer (e.g., “Gig Promotions Ltd”).
- Date Range: Overall duration of the event.
- Status: Active/Inactive.
- Session Count: How many distinct sessions are within this event (e.g., “4 Sessions”).
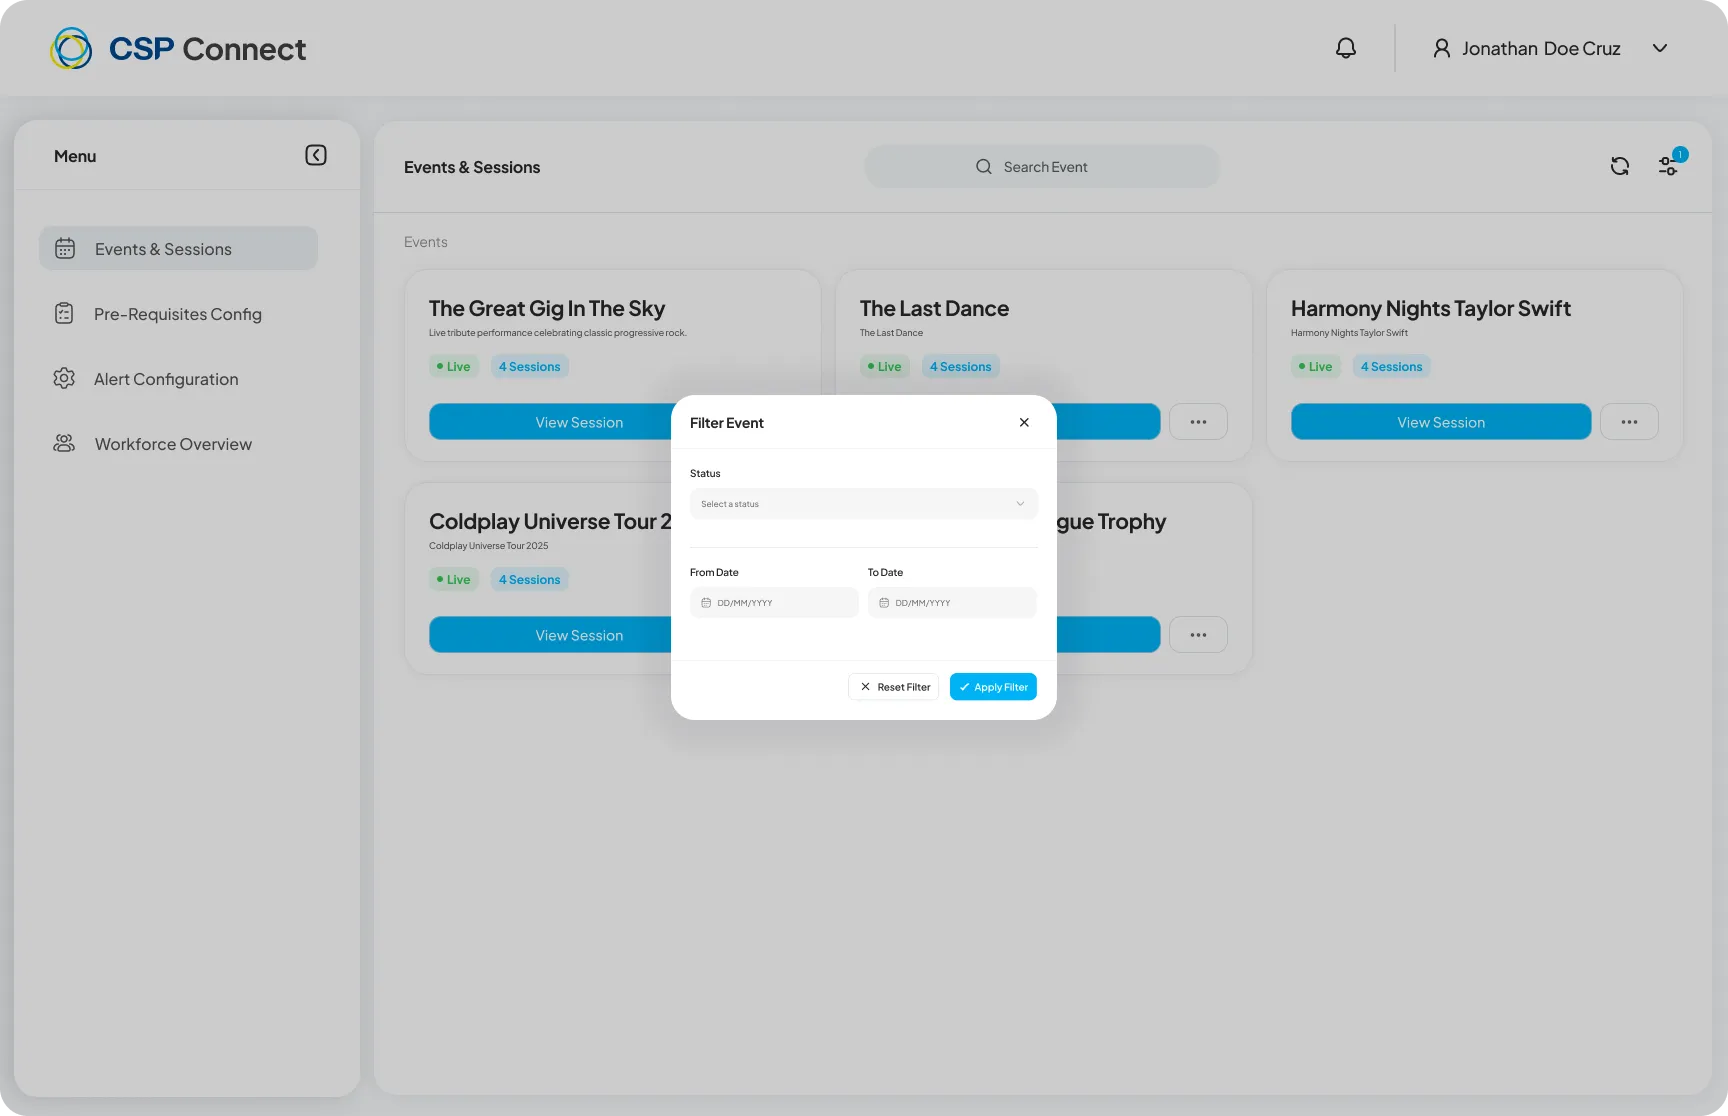
Use the Filter icon to narrow the event list by status or date range.
View toggle: card view and table view
Section titled “View toggle: card view and table view”Use the view toggle in the top right to switch between card view (default) and table view. The table view displays event title, the number of sessions mapped for today and the next 13 days (14-day rolling window), and a ⋯ options button per row.
Event sorting
Section titled “Event sorting”Events are sorted with all live events first in A–Z order, followed by non-live events in A–Z order. This applies to both card and table view. Changing an event’s live status moves it to the correct group immediately.
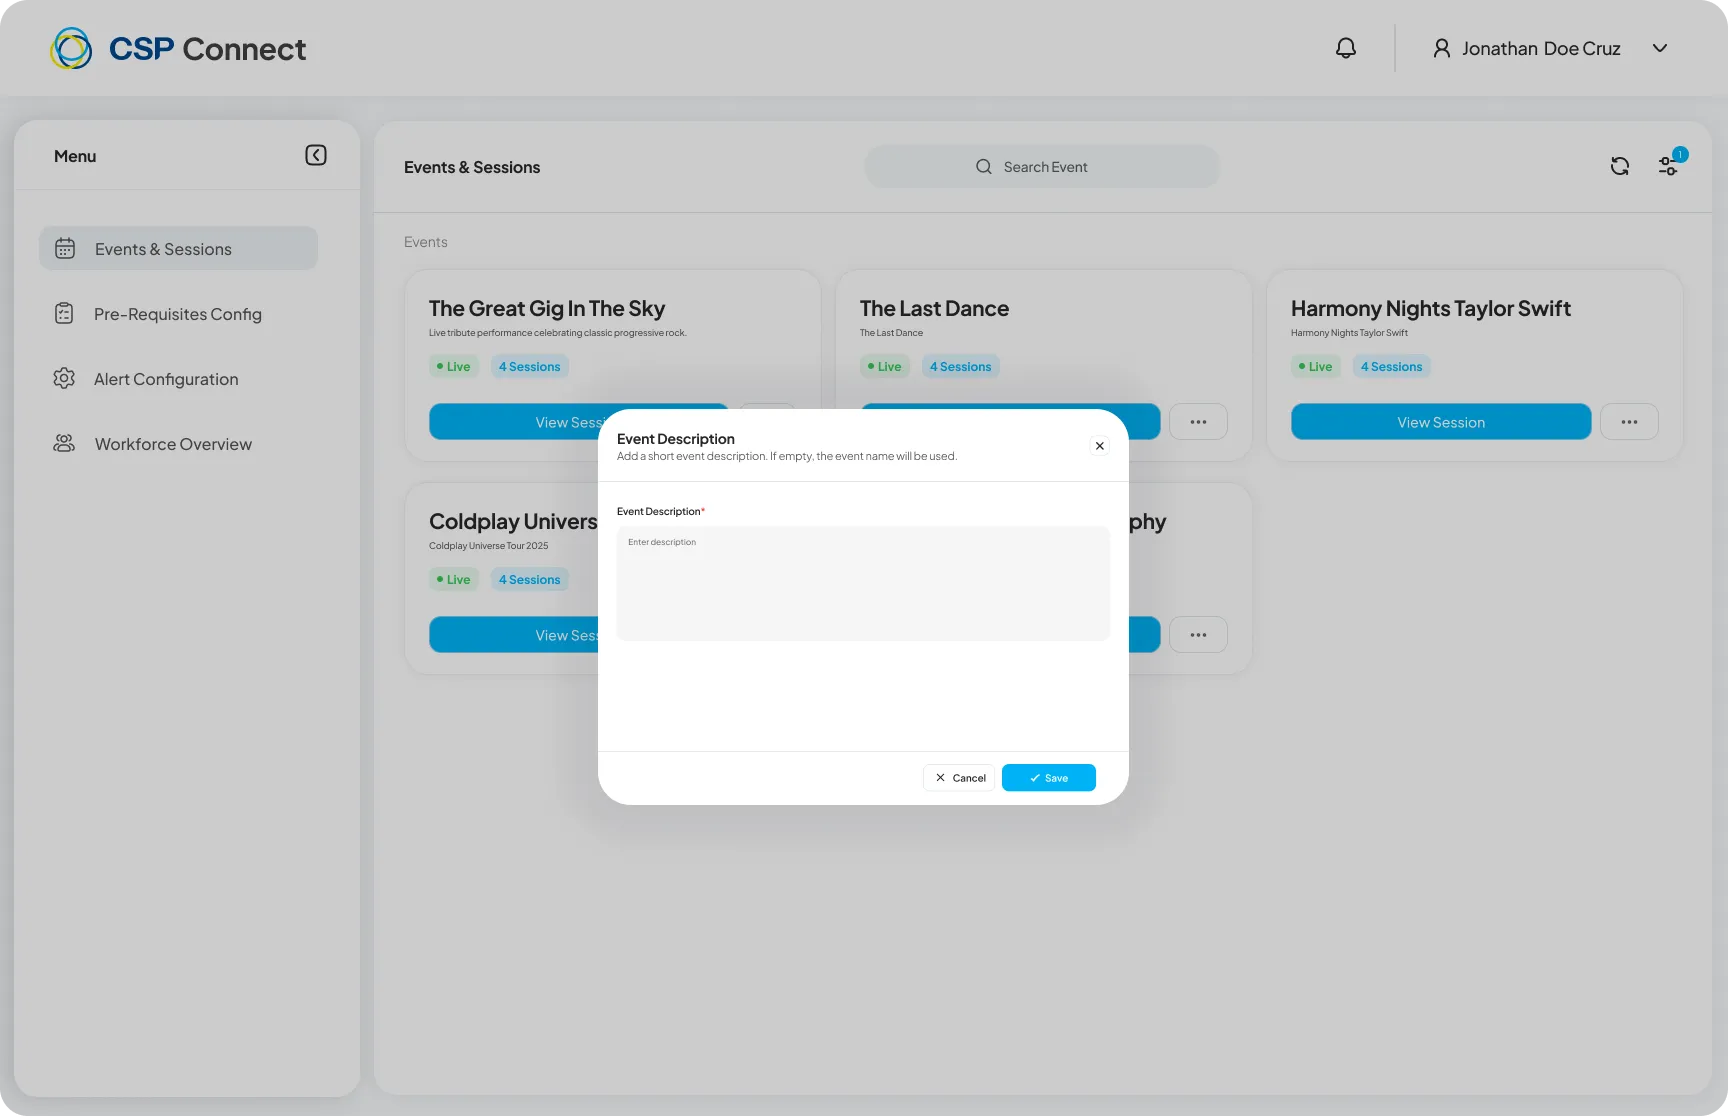
Click the ⋯ menu on any event card to Add / Edit Description.
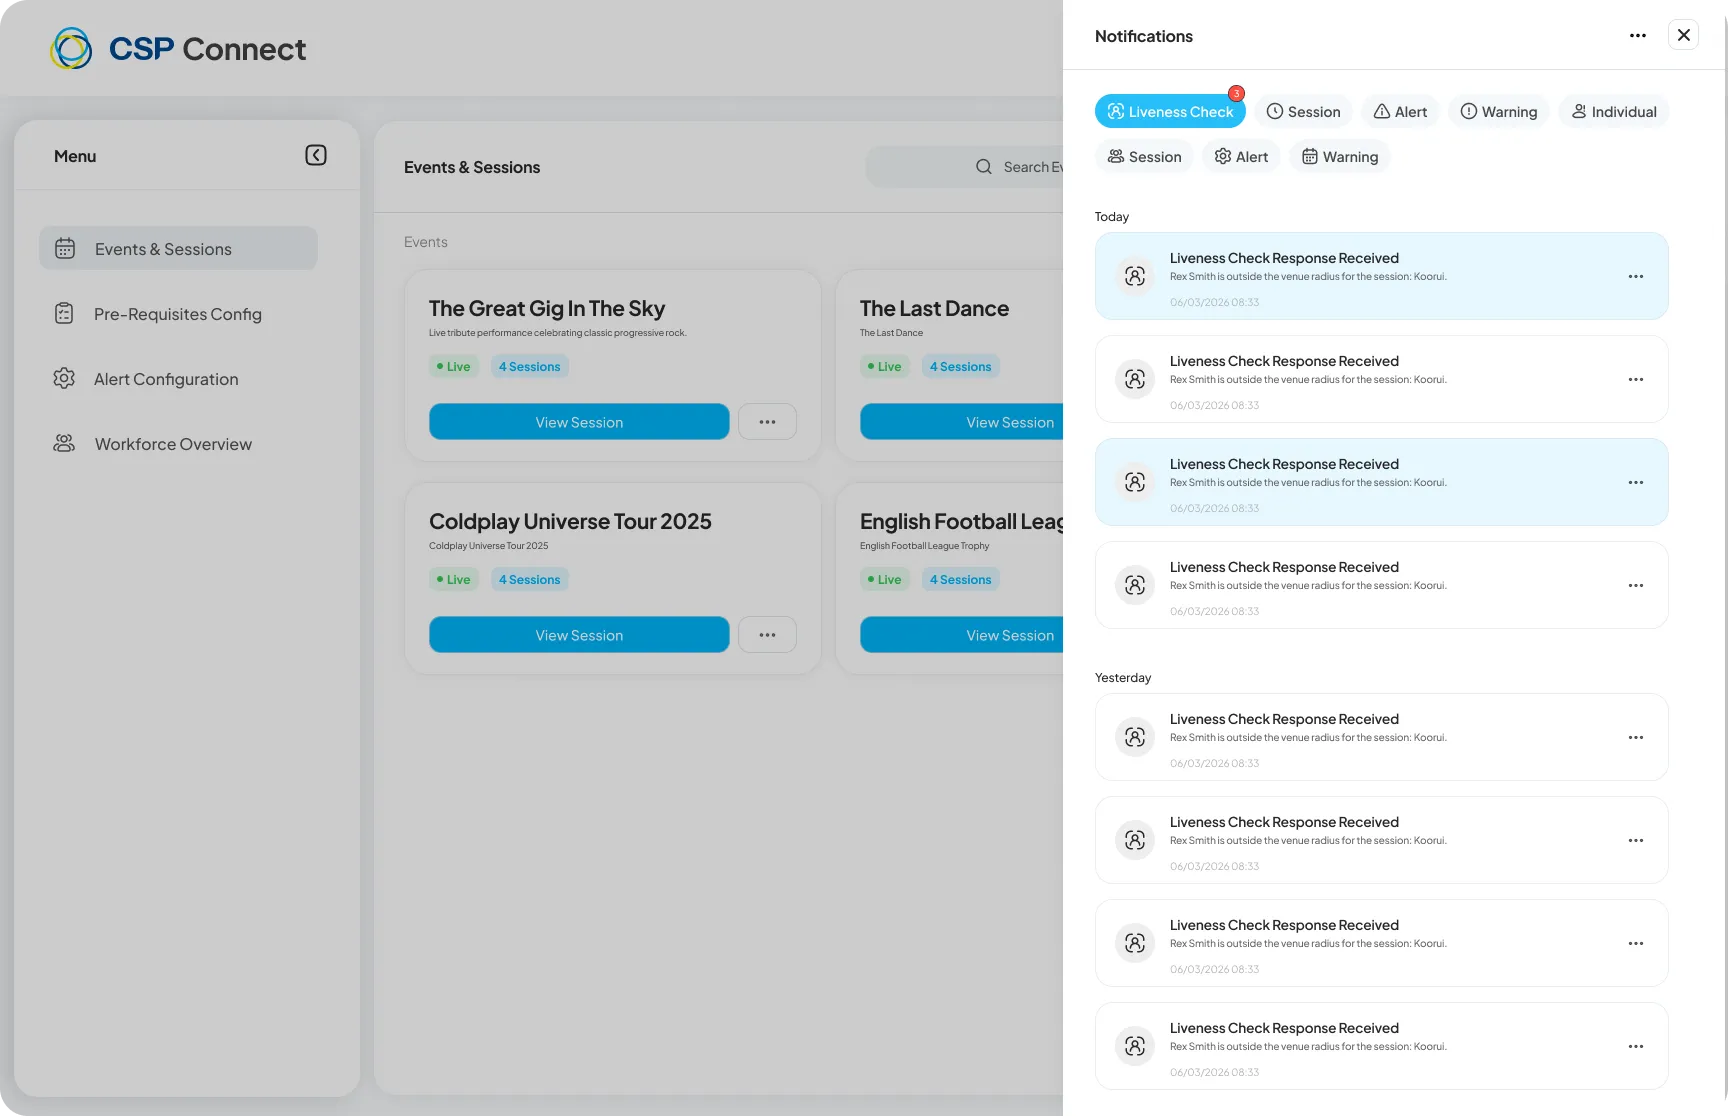
Click the bell icon to view all recent notifications, including liveness check responses and alerts.
Event & Session Details
Section titled “Event & Session Details”Clicking on any card in the Event List (or using the filter) opens the Event & Session Details view. This view is divided into two main sections: Event Details and the Session List.
1. Event Details (Top Section)
Section titled “1. Event Details (Top Section)”This panel summarizes the global settings for the event:
- Location: e.g., “Birmingham Arena, Birmingham”.
- Total Staff: Total number of casual workers assigned across all sessions.
2. Session List (Bottom Section)
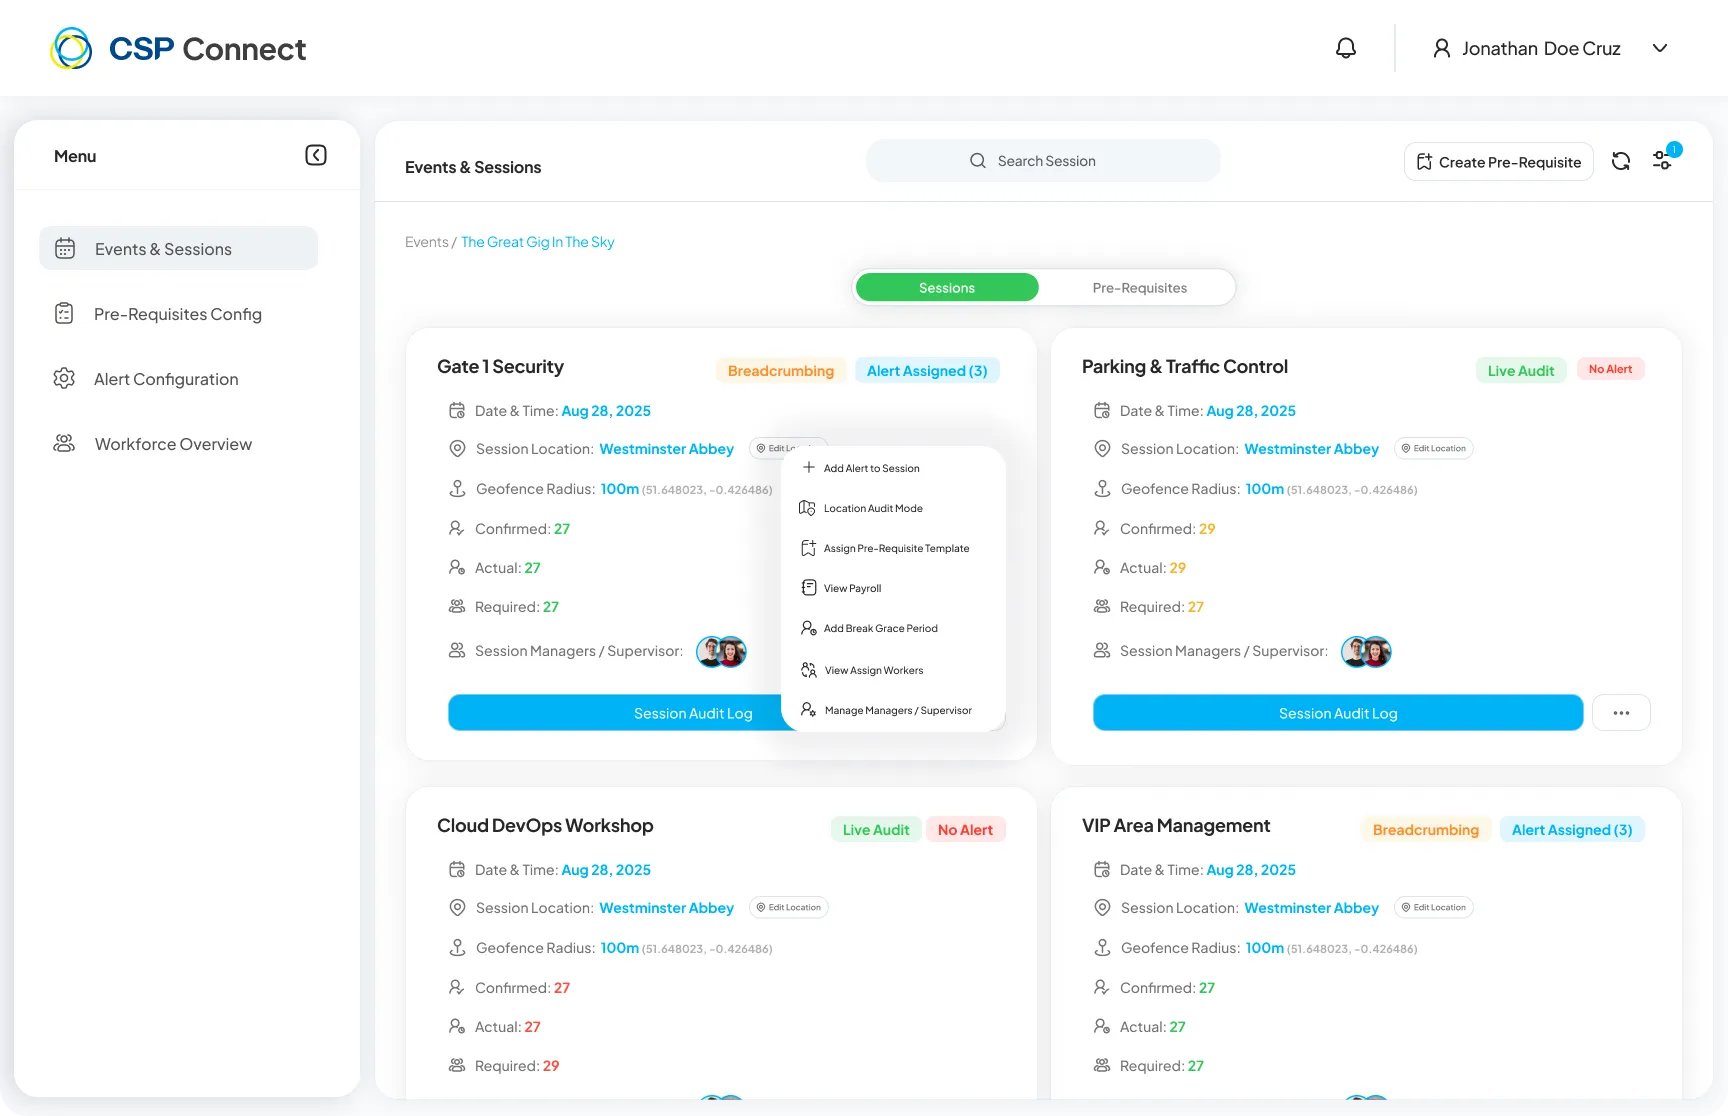
Section titled “2. Session List (Bottom Section)”Here you see the specific shifts (Sessions) that workers are assigned to.
- Session Name: e.g., “Gate 1 Security”, “Main Stage Setup”.
- Date & Time: Specific hours for that shift.
- Staffing Levels: e.g., “5/8” means 5 workers are assigned out of 8 required.
- Linked Status: Shows if the session is linked to the external Rota system.
- Link to Rota: Click this button to sync the session with the external CSP Rota system.
- Assign Casual Workers: Click to open the Casual Worker Management page to manually add or remove workers from this specific session.
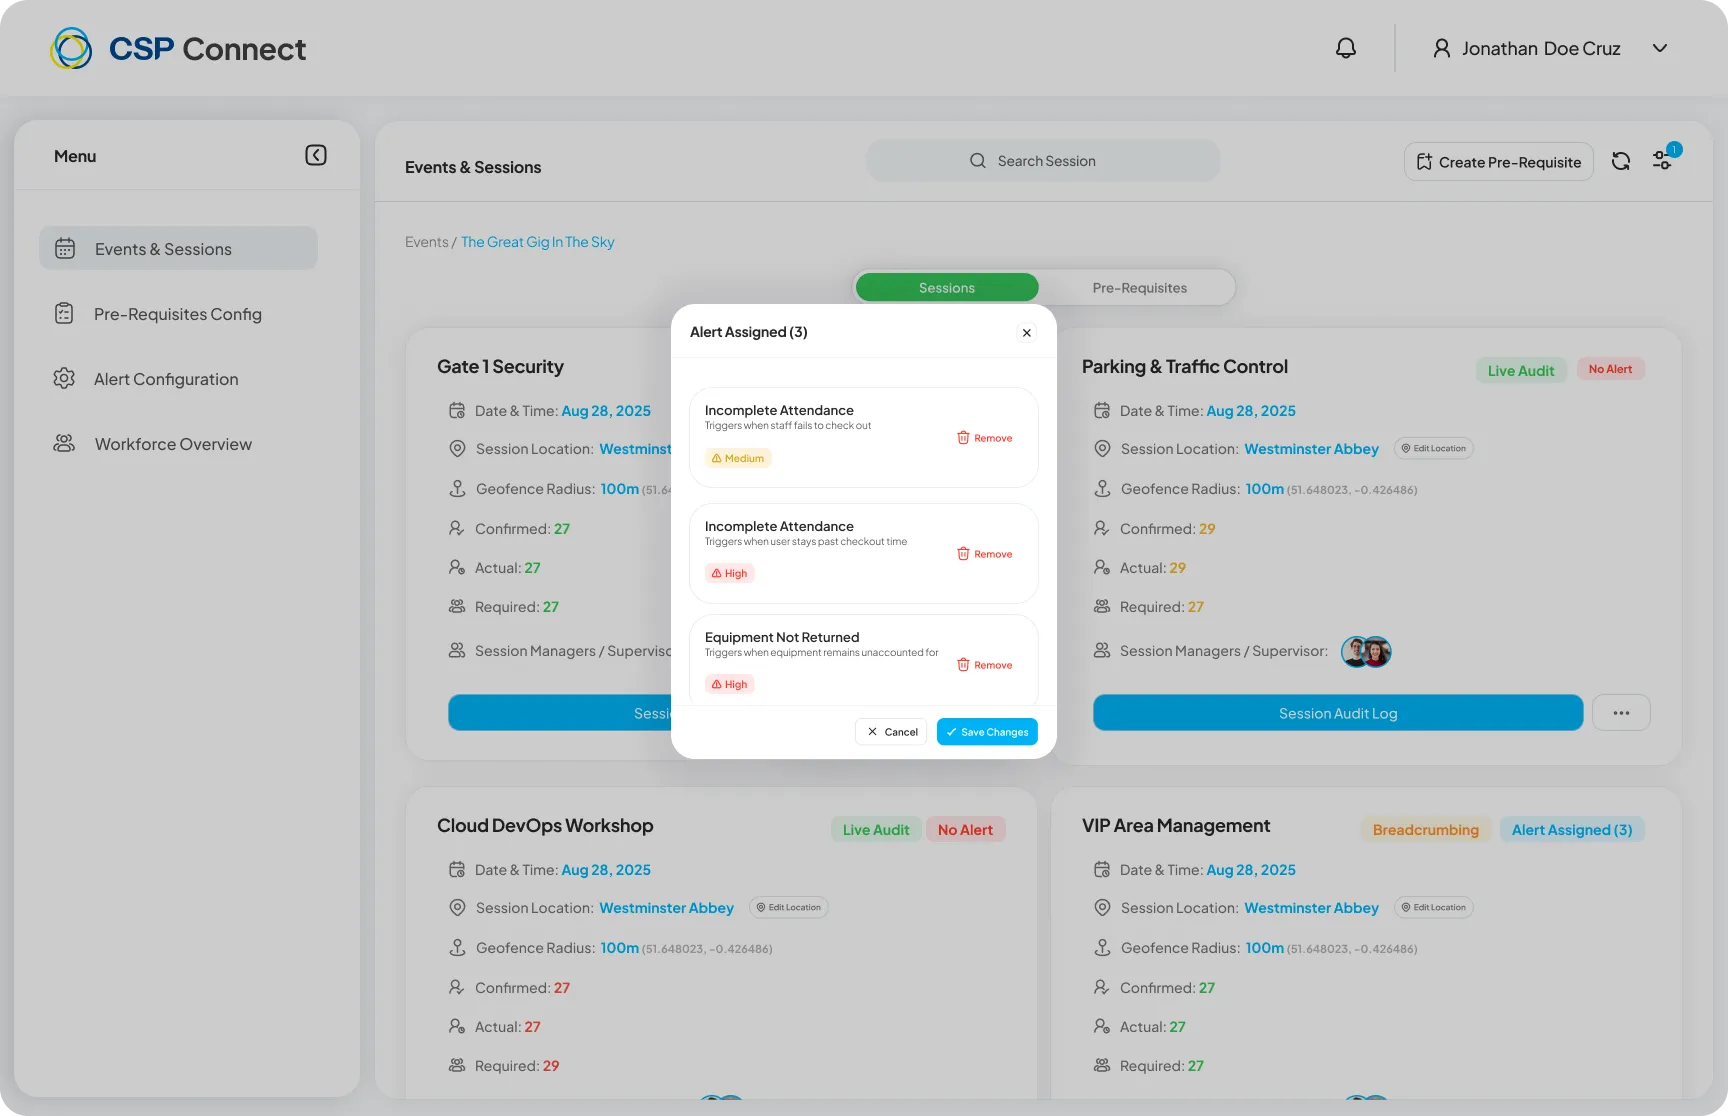
Alerts on Sessions
Section titled “Alerts on Sessions”Sessions with active alerts display an Alert Assigned badge. Click it to view the triggered alerts and their severity.
Assigning Managers at Event Level New
Section titled “Assigning Managers at Event Level ”NewAdmins can assign managers directly at the event level. Once assigned, the manager can view and manage all sessions nested within that event without needing to be manually assigned to each individual session.
- Multiple managers can be assigned to a single event.
- Only admins can assign managers at event scope — standard users cannot assign themselves.
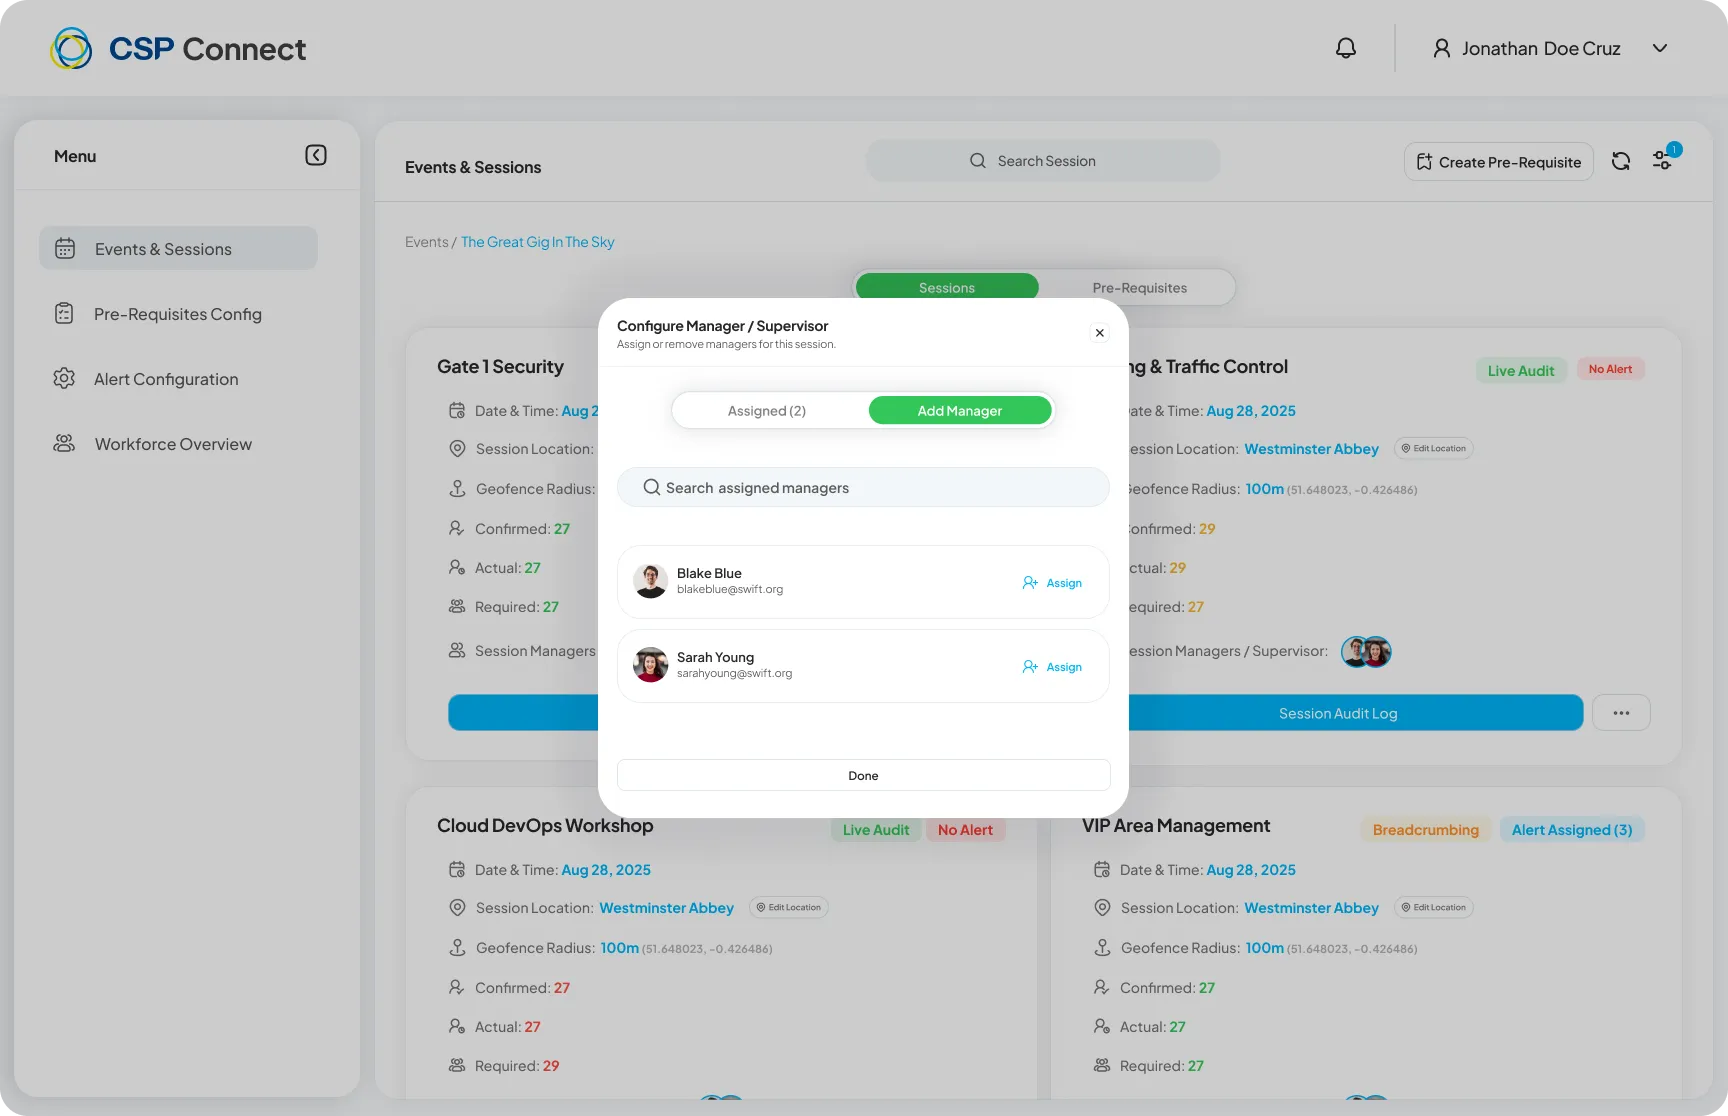
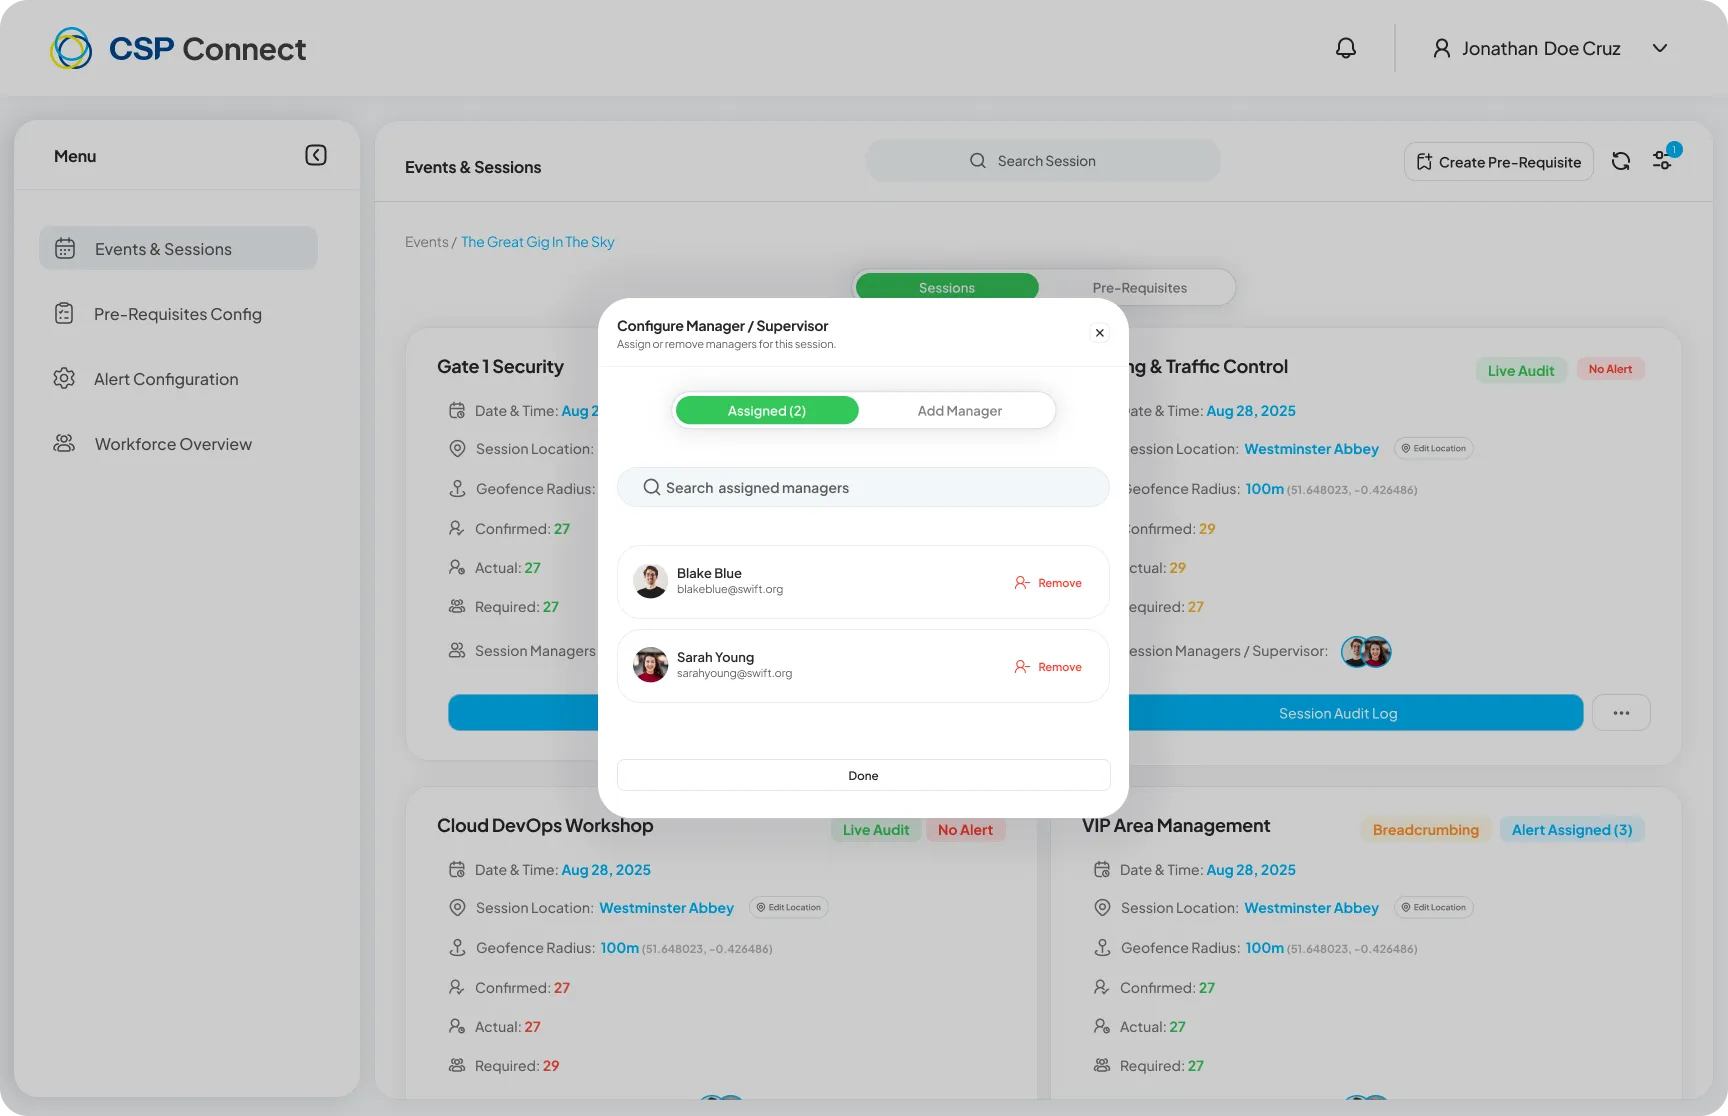
Configuring Session Managers
Section titled “Configuring Session Managers”Click the managers icon on a session card to assign or remove supervisors for that specific session.
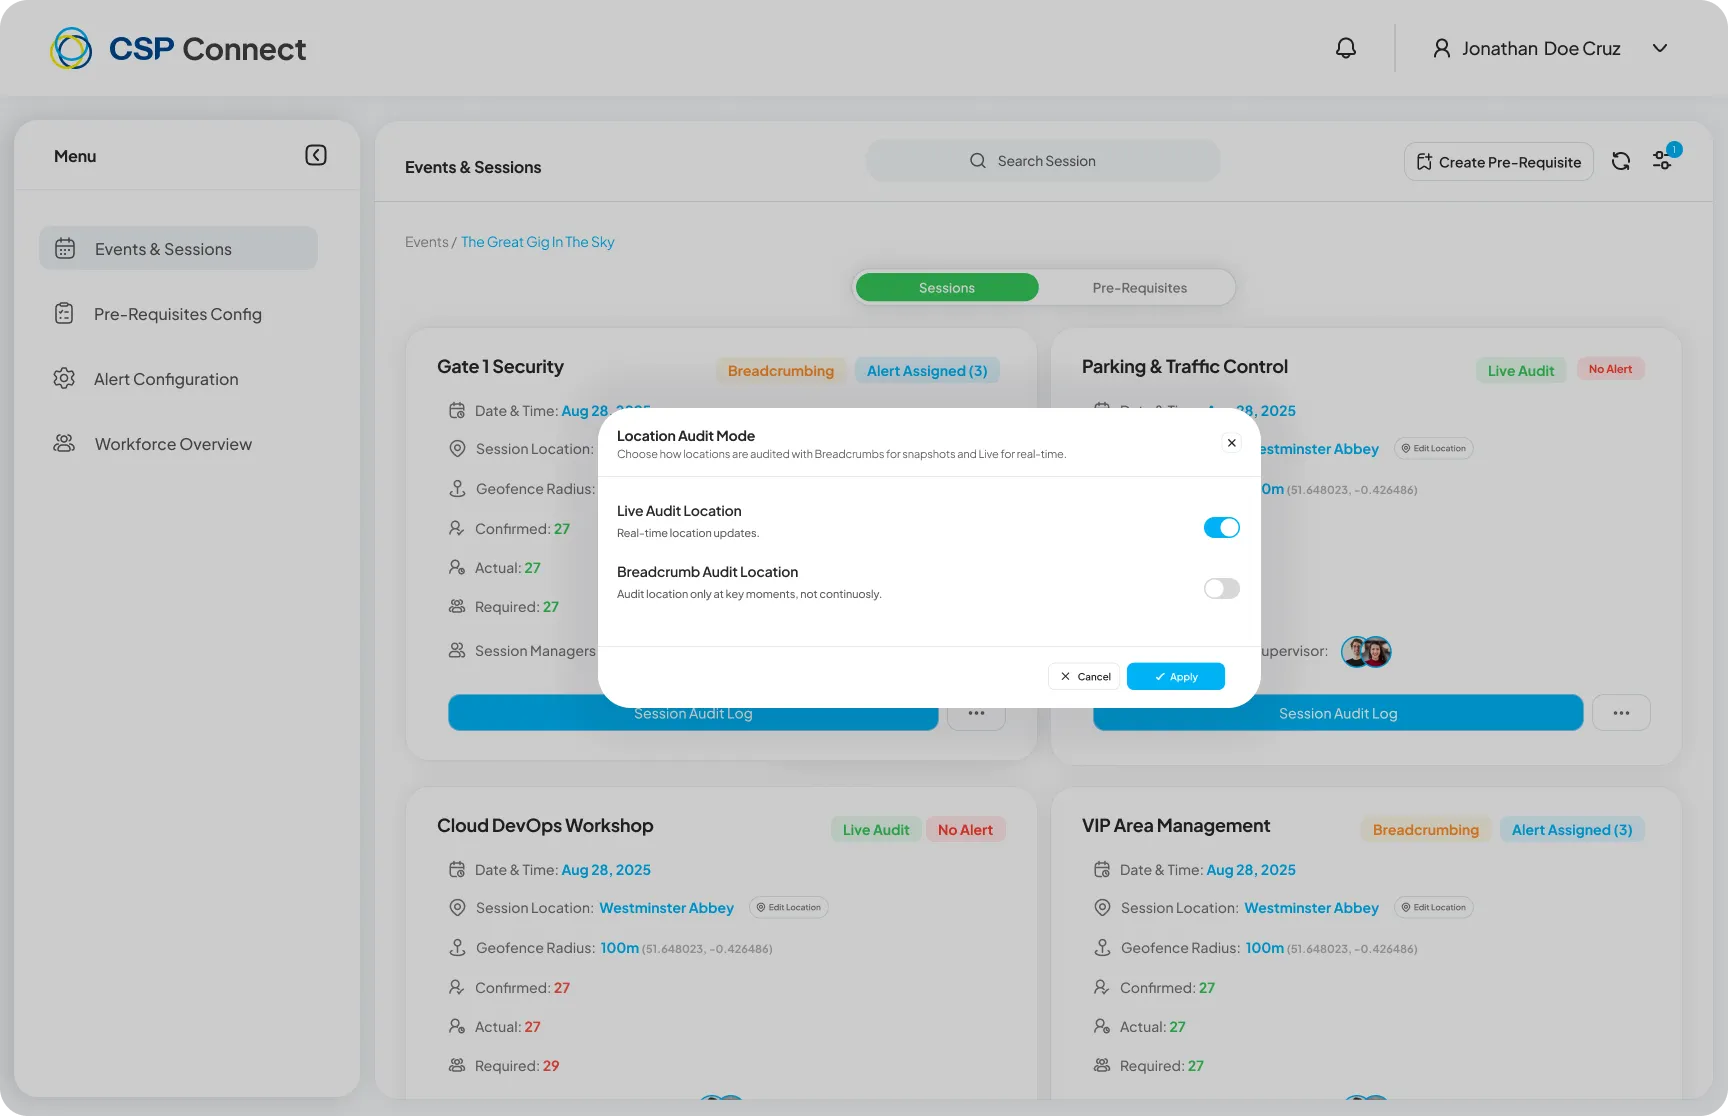
Location Audit Mode
Section titled “Location Audit Mode”Enable Location Audit Mode on a session to control how worker locations are tracked and validated during the session.
Set Location for All Sessions New
Section titled “Set Location for All Sessions ”NewWhen configuring an event, admins can apply a single location to all sessions in one action - removing the need to configure each session individually.
Session Prerequisites - File Attachments New
Section titled “Session Prerequisites - File Attachments ”NewPDF and document files can be attached to session prerequisites. Workers on mobile can view attached files via the Google Docs viewer or download them directly to their device.
Event Pre-Requisites
Section titled “Event Pre-Requisites”The Pre-Requisites tab at the event level lists all configured pre-requisites with their gating mode, due date, and requirements.
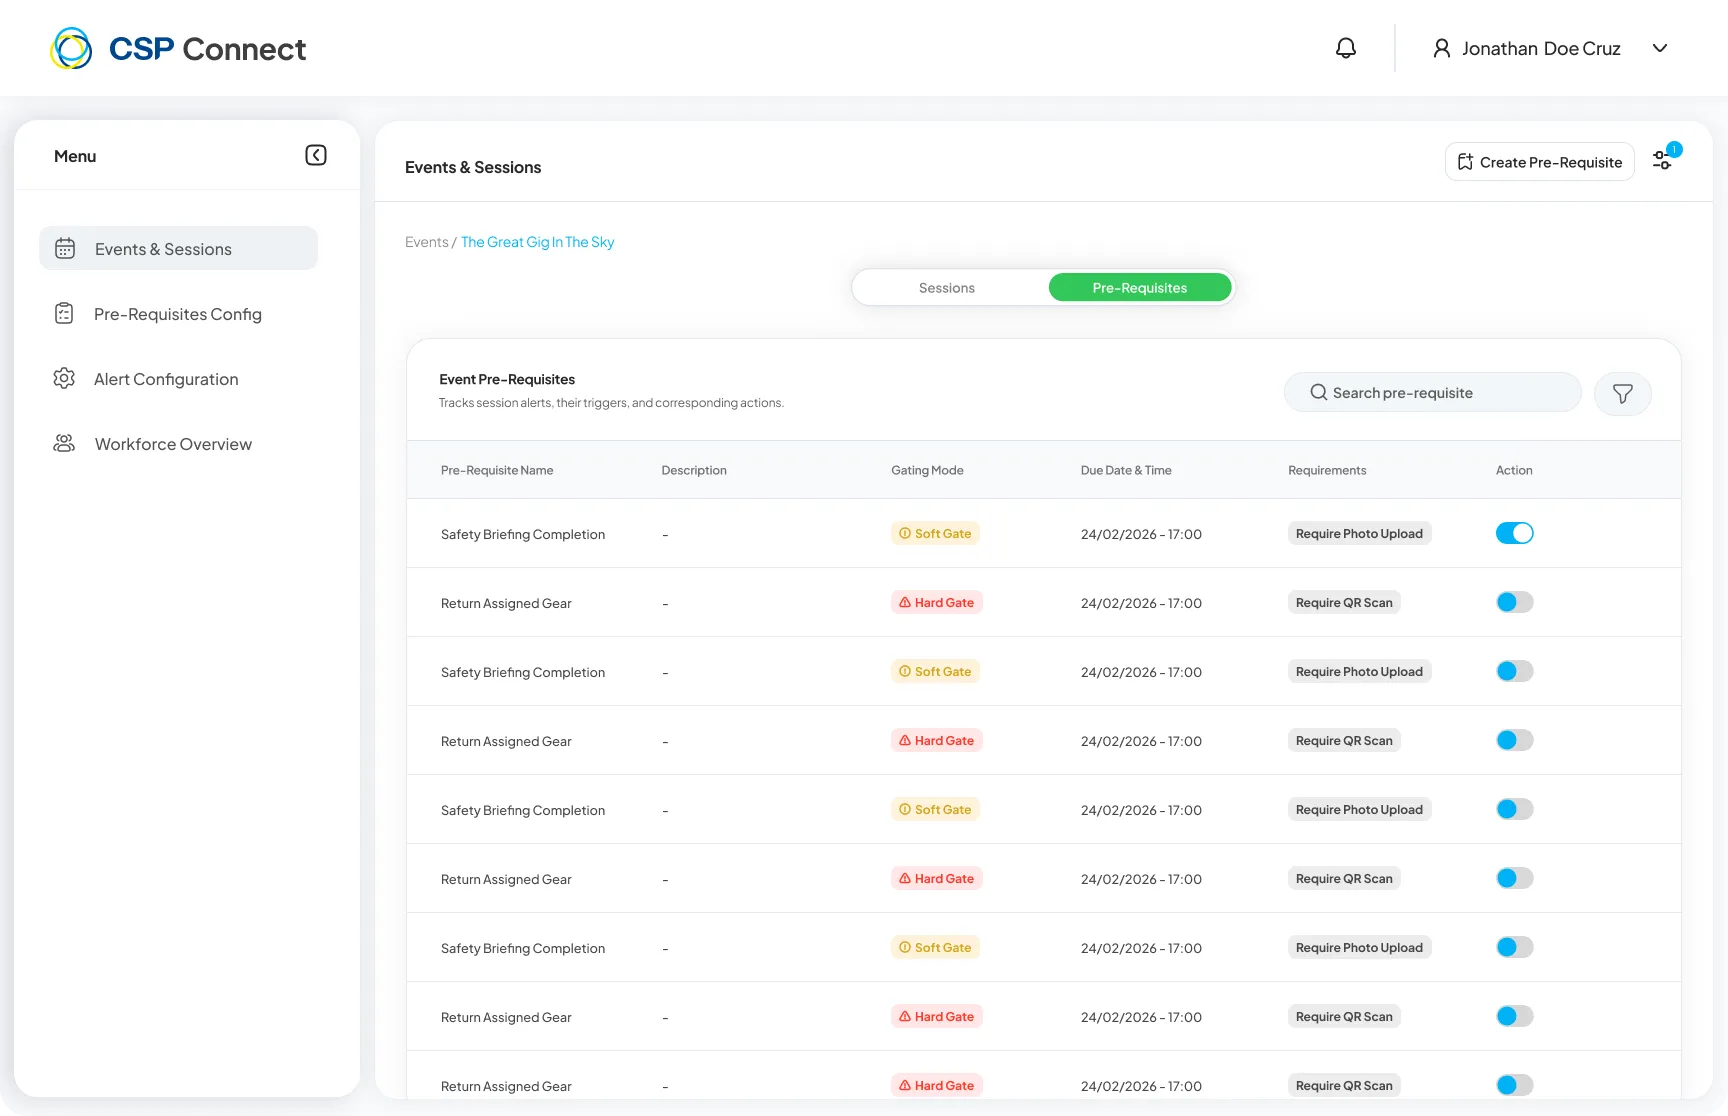
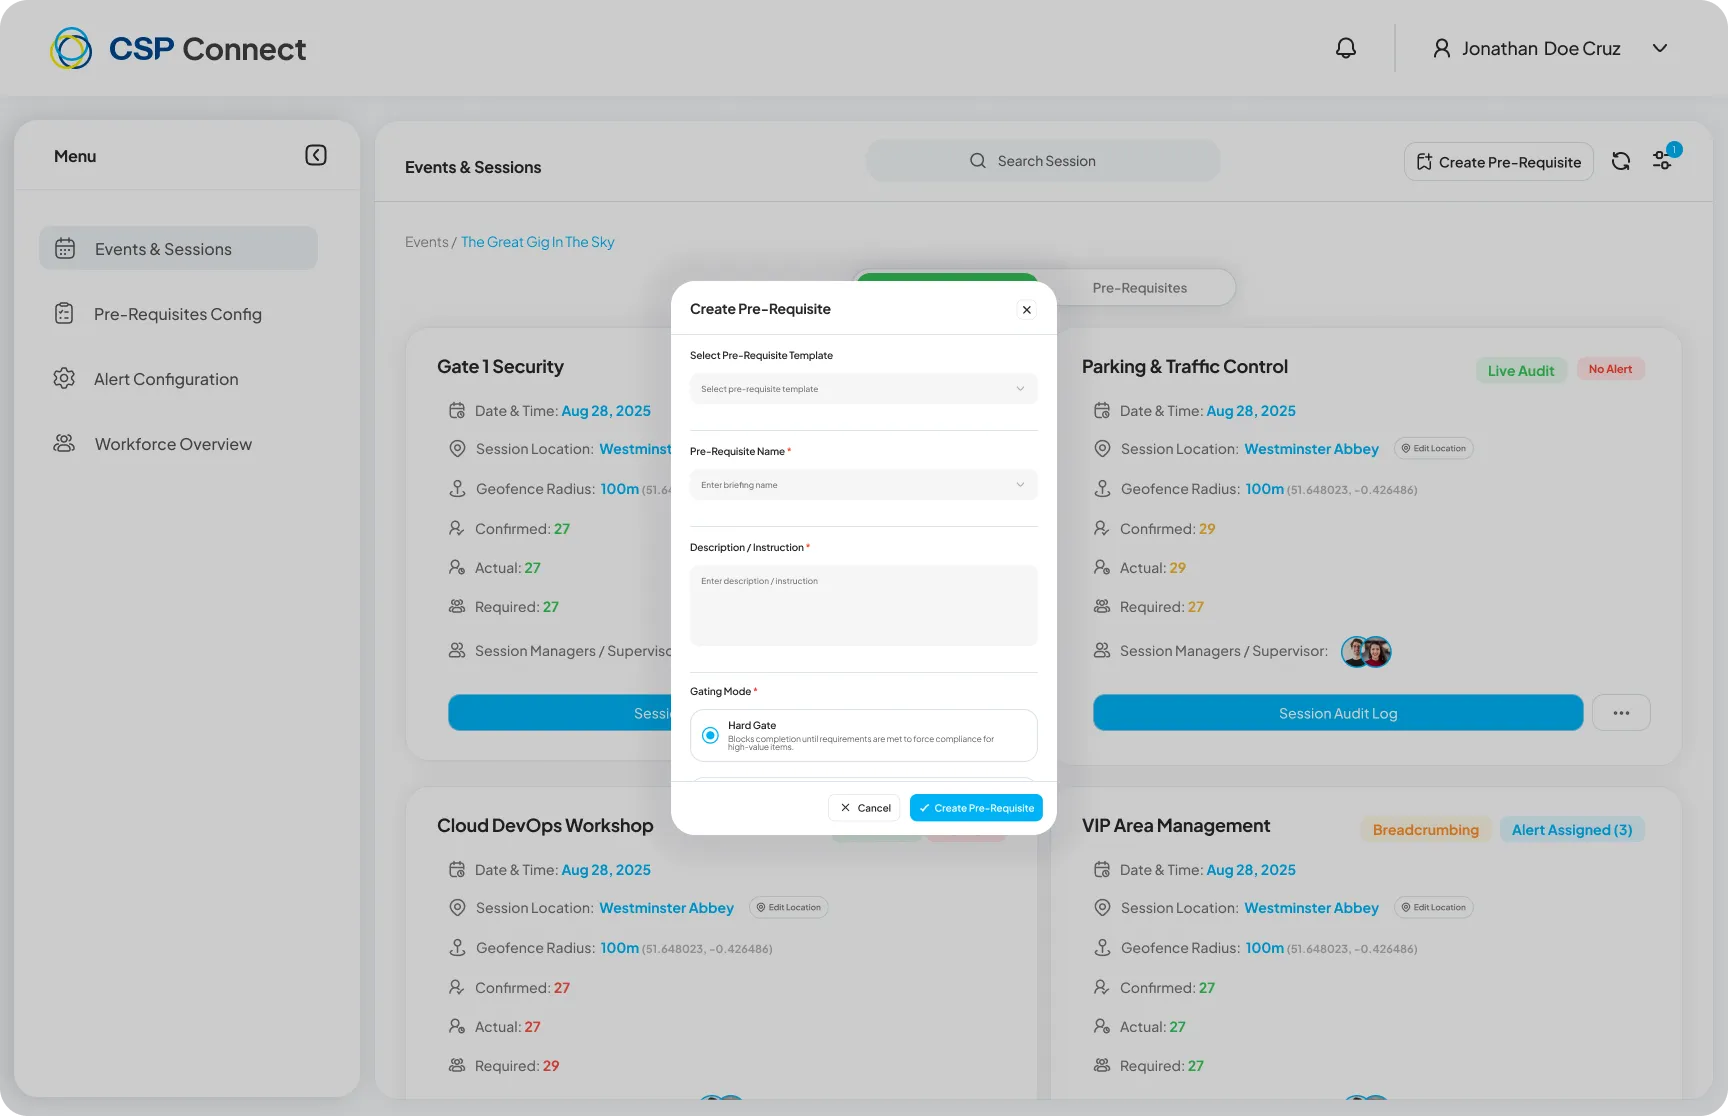
Click Create Pre-Requisite to add a new one. When creating a template, you can attach a document directly from the Prerequisites Config page — attached files are available to workers when they view the prerequisite.
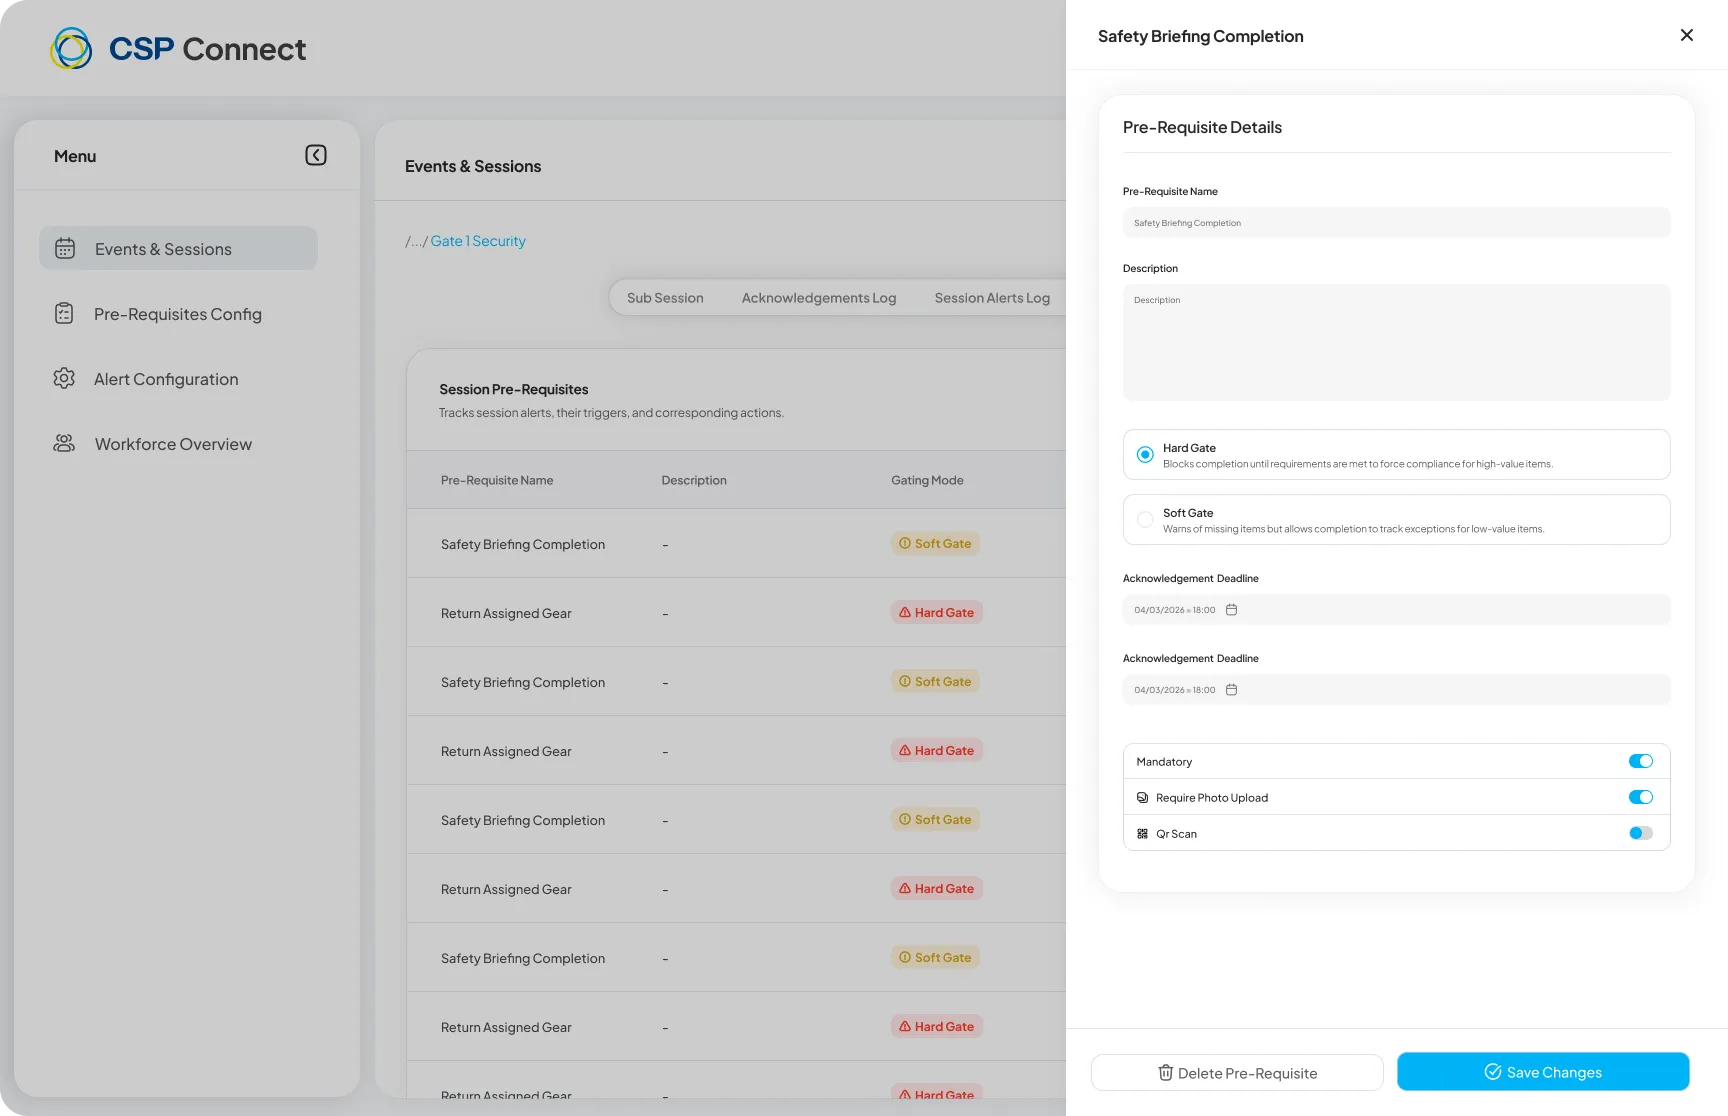
Session Pre-Requisites
Section titled “Session Pre-Requisites”Session-level pre-requisites can be individually enabled or disabled using the toggle in the Action column.
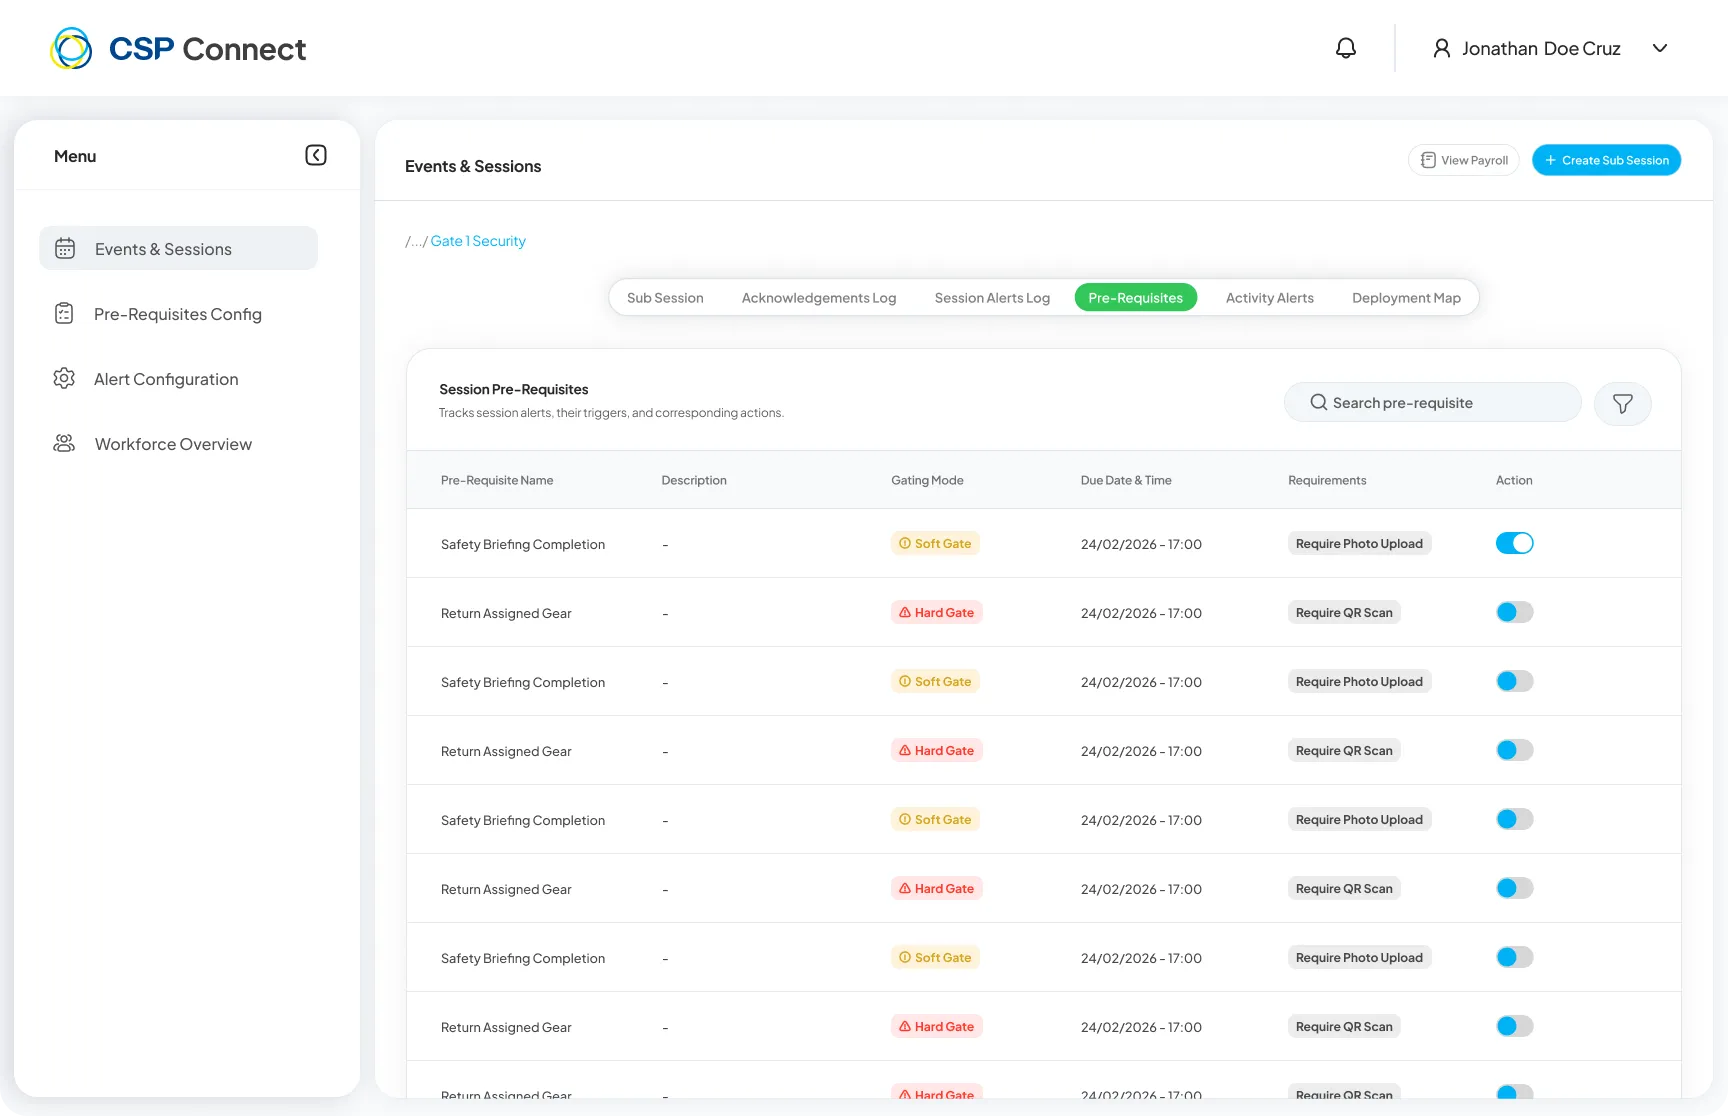
Click any pre-requisite to edit its name, description, gating mode, deadlines, and requirements.
Prerequisite types
Section titled “Prerequisite types”When creating a prerequisite, select the Type to define what the worker must complete. Available types include:
- Standard acknowledgement
- Document review
- Induction :badge[New]{variant="success"} — sets an induction as a prerequisite. Workers can acknowledge induction requirements from both the mobile app and the kiosk tablet during on-site check-in.
Gating time: before check-in or before check-out New
Section titled “Gating time: before check-in or before check-out ”NewWhen creating or editing a pre-requisite, set the Gating Time to control when it is presented to the worker:
| Option | What it does |
|---|---|
| Before Check-In | The worker must complete this prerequisite before the check-in action becomes available. |
| Before Check-Out | The worker must complete this prerequisite before the check-out action becomes available. |
The selected gating time is visible on the session pre-requisites view. Workers are presented with the correct prerequisites at the appropriate point in their check-in or check-out flow.
Reverting a Pre-Requisite Acknowledgement New
Section titled “Reverting a Pre-Requisite Acknowledgement ”NewIf a worker acknowledged a pre-requisite by mistake, managers can revert their acknowledgement. This resets the worker’s compliance state for that pre-requisite and allows them to re-submit when ready.
Break Grace Periods New
Section titled “Break Grace Periods ”NewAdmins and managers can configure break grace periods to give workers travel time to and from their break location without it counting against their break time.
Event Level
Section titled “Event Level”At the event level, you can create, edit, and delete grace period templates that apply across the event.
Session Level
Section titled “Session Level”At the session level, you can:
- Create a new grace period specific to that session.
- Select an existing grace period from the event-level templates.
- Edit or delete the grace period assigned to the session.
Extended Hours Requests New
Section titled “Extended Hours Requests ”NewAdmins can request a worker to extend their scheduled hours directly from the platform. The worker receives a prompt in the app asking them to confirm whether they will continue working past their scheduled end time.